The Ultimate Guide to Cleaning Headphone Pads

Headphone pads are often overlooked in the realm of personal tech hygiene. Yet, their cleanliness is of paramount importance for both sound quality and user comfort. Over time, these pads can accumulate sweat, skin oils, and dirt, which can not only affect your listening experience but also harbor germs that could lead to skin irritations.
This blog aims to provide you with a comprehensive, step-by-step guide on how to effectively clean your headphone pads and maintain them properly for an optimal audio experience. So, whether you’re a casual listener or an audiophile, let’s dive into the nitty-gritty of keeping your headphones in top shape.
Understanding the Importance of Cleaning Headphone Pads
Just like other personal devices, headphones are in regular contact with our skin and environment, making them prone to collecting dirt, oil, and sweat. Here’s why cleaning headphone pads should be part of your routine device care.
The Impact of Sweat, Oil, and Dirt Build-Up on Headphone Pads
Over time, sweat and oils from your skin, along with the dust and dirt from the environment, can accumulate on your headphone pads. This build-up not only leads to the pads looking and smelling less than pleasant but can also result in muffled sound quality.
The accumulated particles may obstruct the sound delivery, leading to a less-than-optimal listening experience.
Potential Skin Irritation Issues
The trapped sweat and oils can create a suitable environment for bacteria to thrive. Using such headphones for extended periods might lead to skin irritations or even infections.
Cleaning your headphone pads regularly helps prevent these health concerns.
Deterioration of Headphone Pads Over Time
The accumulation of sweat, oils, and dirt can hasten the degradation of the headphone pad material, whether it’s leather, pleather, fabric, or velour. This deterioration not only reduces the lifespan of your headphones but also hampers their fit and comfort.
Role of Regular Cleaning in Increasing Headphone Lifespan
Regular and proper cleaning of headphone pads helps maintain the quality of the materials, ensuring your headphones last longer. It also preserves the sound quality and the overall user experience.
It’s an easy and effective way to protect your investment, especially if you own a high-end pair.
Determining the Type of Your Headphone Pads
Before diving into the cleaning process, it’s crucial to know the type of material your headphone pads are made from. The material type will dictate the cleaning method to ensure you don’t damage the pads in the process.
Different Materials for Headphone Pads
Headphone pads can be made from a variety of materials, each with their own unique qualities. The most common ones include leather (genuine or synthetic), velour, and fabric.
Leather pads are renowned for their durability and comfort, while velour and fabric pads are loved for their softness and breathability.
Why the Cleaning Method Varies Based on the Pad Material
Not all cleaning methods are suitable for all materials. For instance, using water to clean leather pads can lead to them hardening and cracking over time, while velour pads may withstand mild water-based cleaning.
Using the wrong cleaning products can also cause discoloration, loss of texture, or even material degradation.
How to Find Out Your Headphone Pad Material
If you’re unsure of your headphone pad material, you can consult the product manual or the manufacturer’s website. Most companies specify the materials used in their product descriptions.
You could also get in touch with the manufacturer’s customer service for detailed information if the material isn’t listed clearly.
Gathering Necessary Cleaning Materials
Armed with the knowledge of your headphone pad material, the next step is to gather the right cleaning materials. Using the correct tools ensures effective cleaning without damaging the pads.
List of Materials Needed for Cleaning
Depending on the type of material, you may need some or all of the following items:
- Soft cloth or microfiber towel
- Mild soap or detergent
- Cleaning wipes (preferably alcohol-free for leather)
- A small brush with soft bristles (like a toothbrush)
Remember, the list above is a general guide and not all items might be applicable to your headphone pad material.
Suggested Cleaning Agents and Tools for Different Materials
- Leather pads: Use a slightly damp cloth with a bit of leather cleaner or mild soap. Avoid soaking the pads as this could damage them.
- Velour pads: Use a small brush to gently remove debris. If necessary, a lightly damp cloth with mild soap can be used.
- Fabric pads: Brush off any dirt or debris, and use a cloth dampened with a gentle detergent if needed.
- Pleather (synthetic leather) pads: Use a soft, dry cloth to wipe off most of the dirt. If further cleaning is needed, dampen the cloth slightly with mild soap.
The Importance of Using Gentle, Non-Abrasive Materials
Whether you’re dealing with genuine leather or fabric pads, it’s crucial to use gentle, non-abrasive cleaning materials. Abrasive materials or harsh cleaning agents can scratch, discolor, or degrade the material over time.
Always opt for soft cloths, gentle soaps, and mild detergents when cleaning headphone pads.
Step-by-Step Guide to Cleaning Headphone Pads
Now that we’ve identified the material of the headphone pads and gathered the necessary cleaning materials, it’s time to start the cleaning process. The steps vary slightly based on the material of the headphone pads.
General Steps Applicable to All Types of Headphone Pads
- Removal: Most headphone pads are detachable. Carefully remove the pads from the headphones to avoid damaging any connected parts. Consult your device manual if you’re unsure how to do this.
- Initial Cleaning: Using a dry, soft brush, gently remove any surface dirt or dust from the pads.
- Deeper Cleaning: Follow the specific instructions for your headphone pad material (below).
- Drying: Let the pads dry completely before reattaching them to the headphones. This step is crucial as moisture can damage the headphones’ internal components.
Specific Cleaning Steps for Each Material Type
- Cleaning Leather Headphone Pads
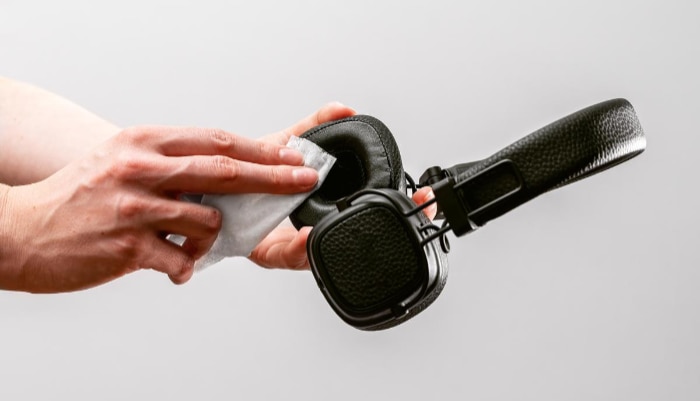
Gently wipe the surface with a cloth slightly dampened with leather cleaner or mild soap. Avoid soaking the pads. After cleaning, use a dry cloth to remove excess moisture.
- Cleaning Velour Headphone Pads
Use a soft brush to remove any debris. For stubborn dirt, a cloth lightly dampened with mild soap can be used. Gently scrub the area, then use a dry cloth to absorb any excess moisture.
- Cleaning Pleather (Synthetic Leather) Headphone Pads
Wipe off the dirt with a soft, dry cloth. If the pads are very dirty, use a cloth slightly dampened with mild soap. Wipe again with a dry cloth to remove any leftover soap.
- Cleaning Fabric Headphone Pads
Brush off any dirt or debris first. If needed, use a cloth dampened with a gentle detergent. Rinse the cloth and wipe the pads again to remove soap residue, then dab with a dry towel to absorb excess water.
Remember, the goal is to clean the headphone pads without oversaturating them with moisture. Excessive wetness can damage the material and may potentially seep into the headphones, causing further damage.
Following these steps should help maintain the condition and comfort of your headphone pads while ensuring great sound quality.
Drying and Re-attaching Headphone Pads
Post-cleaning, correctly drying and reattaching your headphone pads is as important as the cleaning process itself. The following steps will guide you through this phase.
The Importance of Completely Drying Pads Before Reattachment
Thoroughly drying the pads before reattaching them to the headphones is critical. Even a little moisture can damage the headphones’ inner workings or cause mildew and mold growth over time, leading to unpleasant odors and potential health hazards.
Guidelines on How to Dry Different Types of Pads Properly
- Leather and Pleather pads: After cleaning, immediately use a dry, soft cloth to blot any excess moisture. Then, leave them to air dry in a well-ventilated area away from direct sunlight and heat, as these can cause the material to crack or warp.
- Velour and Fabric pads: After removing excess moisture with a dry cloth, let them air dry. Do not use a hairdryer or place them near a heater, as the high heat can shrink or deform the pads.
Step-by-Step Guide to Re-attaching Pads Without Causing Damage
Once the pads are completely dry, you can reattach them to your headphones. The method may vary depending on your headphone model.
If the pads twist and lock into place, align them properly and twist until secure. If they’re held in place by a thin lip of material, carefully stretch this lip over the corresponding part of the headphones.
If you’re unsure, consult your headphone’s user manual or search online for model-specific instructions.
Remember, patience is key during the reattachment process. Trying to force the pads back onto the headphones can result in unnecessary damage.
Conclusion
Taking care of your headphones involves more than just handling them gently or storing them properly. Cleaning the headphone pads regularly plays a significant role in maintaining not just the audio quality and comfort, but also the overall lifespan of the headphones.
From understanding the importance of cleanliness, identifying the pad material, gathering the right cleaning tools, to the actual cleaning and drying process, every step counts towards effective headphone maintenance.
Moreover, regular cleaning provides an opportunity to inspect your headphones for any wear and tear, enabling you to address minor issues before they escalate. So, whether you’re a casual listener, a passionate audiophile, or a professional sound engineer, these cleaning guidelines can help ensure that your headphones deliver the optimum sound quality for years to come.
In essence, caring for your headphone pads equates to caring for your auditory experience. So, let’s embrace the process of cleaning and make it a part of our regular device maintenance routine.
After all, cleaner headphones mean better sound, greater comfort, and a richer, more immersive listening experience.
Headphone pads are often overlooked in the realm of personal tech hygiene. Yet, their cleanliness is of paramount importance for both sound quality and user comfort. Over time, these pads can accumulate sweat, skin oils, and dirt, which can not only affect your listening experience but also harbor germs that could lead to skin irritations.
This blog aims to provide you with a comprehensive, step-by-step guide on how to effectively clean your headphone pads and maintain them properly for an optimal audio experience. So, whether you’re a casual listener or an audiophile, let’s dive into the nitty-gritty of keeping your headphones in top shape.
Understanding the Importance of Cleaning Headphone Pads

Just like other personal devices, headphones are in regular contact with our skin and environment, making them prone to collecting dirt, oil, and sweat. Here’s why cleaning headphone pads should be part of your routine device care.
The Impact of Sweat, Oil, and Dirt Build-Up on Headphone Pads
Over time, sweat and oils from your skin, along with the dust and dirt from the environment, can accumulate on your headphone pads. This build-up not only leads to the pads looking and smelling less than pleasant but can also result in muffled sound quality.
The accumulated particles may obstruct the sound delivery, leading to a less-than-optimal listening experience.
Potential Skin Irritation Issues
The trapped sweat and oils can create a suitable environment for bacteria to thrive. Using such headphones for extended periods might lead to skin irritations or even infections.
Cleaning your headphone pads regularly helps prevent these health concerns.
Deterioration of Headphone Pads Over Time
The accumulation of sweat, oils, and dirt can hasten the degradation of the headphone pad material, whether it’s leather, pleather, fabric, or velour. This deterioration not only reduces the lifespan of your headphones but also hampers their fit and comfort.
Role of Regular Cleaning in Increasing Headphone Lifespan
Regular and proper cleaning of headphone pads helps maintain the quality of the materials, ensuring your headphones last longer. It also preserves the sound quality and the overall user experience.
It’s an easy and effective way to protect your investment, especially if you own a high-end pair.
Determining the Type of Your Headphone Pads
Before diving into the cleaning process, it’s crucial to know the type of material your headphone pads are made from. The material type will dictate the cleaning method to ensure you don’t damage the pads in the process.
Different Materials for Headphone Pads
Headphone pads can be made from a variety of materials, each with their own unique qualities. The most common ones include leather (genuine or synthetic), velour, and fabric.
Leather pads are renowned for their durability and comfort, while velour and fabric pads are loved for their softness and breathability.
Why the Cleaning Method Varies Based on the Pad Material
Not all cleaning methods are suitable for all materials. For instance, using water to clean leather pads can lead to them hardening and cracking over time, while velour pads may withstand mild water-based cleaning.
Using the wrong cleaning products can also cause discoloration, loss of texture, or even material degradation.
How to Find Out Your Headphone Pad Material
If you’re unsure of your headphone pad material, you can consult the product manual or the manufacturer’s website. Most companies specify the materials used in their product descriptions.
You could also get in touch with the manufacturer’s customer service for detailed information if the material isn’t listed clearly.
Gathering Necessary Cleaning Materials
Armed with the knowledge of your headphone pad material, the next step is to gather the right cleaning materials. Using the correct tools ensures effective cleaning without damaging the pads.
List of Materials Needed for Cleaning
Depending on the type of material, you may need some or all of the following items:
- Soft cloth or microfiber towel
- Mild soap or detergent
- Cleaning wipes (preferably alcohol-free for leather)
- A small brush with soft bristles (like a toothbrush)
Remember, the list above is a general guide and not all items might be applicable to your headphone pad material.
Suggested Cleaning Agents and Tools for Different Materials
- Leather pads: Use a slightly damp cloth with a bit of leather cleaner or mild soap. Avoid soaking the pads as this could damage them.
- Velour pads: Use a small brush to gently remove debris. If necessary, a lightly damp cloth with mild soap can be used.
- Fabric pads: Brush off any dirt or debris, and use a cloth dampened with a gentle detergent if needed.
- Pleather (synthetic leather) pads: Use a soft, dry cloth to wipe off most of the dirt. If further cleaning is needed, dampen the cloth slightly with mild soap.
The Importance of Using Gentle, Non-Abrasive Materials
Whether you’re dealing with genuine leather or fabric pads, it’s crucial to use gentle, non-abrasive cleaning materials. Abrasive materials or harsh cleaning agents can scratch, discolor, or degrade the material over time.
Always opt for soft cloths, gentle soaps, and mild detergents when cleaning headphone pads.
Step-by-Step Guide to Cleaning Headphone Pads
Now that we’ve identified the material of the headphone pads and gathered the necessary cleaning materials, it’s time to start the cleaning process. The steps vary slightly based on the material of the headphone pads.
General Steps Applicable to All Types of Headphone Pads
- Removal: Most headphone pads are detachable. Carefully remove the pads from the headphones to avoid damaging any connected parts. Consult your device manual if you’re unsure how to do this.
- Initial Cleaning: Using a dry, soft brush, gently remove any surface dirt or dust from the pads.
- Deeper Cleaning: Follow the specific instructions for your headphone pad material (below).
- Drying: Let the pads dry completely before reattaching them to the headphones. This step is crucial as moisture can damage the headphones’ internal components.
Specific Cleaning Steps for Each Material Type
- Cleaning Leather Headphone Pads
Gently wipe the surface with a cloth slightly dampened with leather cleaner or mild soap. Avoid soaking the pads. After cleaning, use a dry cloth to remove excess moisture.
- Cleaning Velour Headphone Pads
Use a soft brush to remove any debris. For stubborn dirt, a cloth lightly dampened with mild soap can be used. Gently scrub the area, then use a dry cloth to absorb any excess moisture.
- Cleaning Pleather (Synthetic Leather) Headphone Pads
Wipe off the dirt with a soft, dry cloth. If the pads are very dirty, use a cloth slightly dampened with mild soap. Wipe again with a dry cloth to remove any leftover soap.
- Cleaning Fabric Headphone Pads
Brush off any dirt or debris first. If needed, use a cloth dampened with a gentle detergent. Rinse the cloth and wipe the pads again to remove soap residue, then dab with a dry towel to absorb excess water.
Remember, the goal is to clean the headphone pads without oversaturating them with moisture. Excessive wetness can damage the material and may potentially seep into the headphones, causing further damage.
Following these steps should help maintain the condition and comfort of your headphone pads while ensuring great sound quality.
Drying and Re-attaching Headphone Pads
Post-cleaning, correctly drying and reattaching your headphone pads is as important as the cleaning process itself. The following steps will guide you through this phase.
The Importance of Completely Drying Pads Before Reattachment
Thoroughly drying the pads before reattaching them to the headphones is critical. Even a little moisture can damage the headphones’ inner workings or cause mildew and mold growth over time, leading to unpleasant odors and potential health hazards.
Guidelines on How to Dry Different Types of Pads Properly
- Leather and Pleather pads: After cleaning, immediately use a dry, soft cloth to blot any excess moisture. Then, leave them to air dry in a well-ventilated area away from direct sunlight and heat, as these can cause the material to crack or warp.
- Velour and Fabric pads: After removing excess moisture with a dry cloth, let them air dry. Do not use a hairdryer or place them near a heater, as the high heat can shrink or deform the pads.
Step-by-Step Guide to Re-attaching Pads Without Causing Damage
Once the pads are completely dry, you can reattach them to your headphones. The method may vary depending on your headphone model.
If the pads twist and lock into place, align them properly and twist until secure. If they’re held in place by a thin lip of material, carefully stretch this lip over the corresponding part of the headphones.
If you’re unsure, consult your headphone’s user manual or search online for model-specific instructions.
Remember, patience is key during the reattachment process. Trying to force the pads back onto the headphones can result in unnecessary damage.
Conclusion
Taking care of your headphones involves more than just handling them gently or storing them properly. Cleaning the headphone pads regularly plays a significant role in maintaining not just the audio quality and comfort, but also the overall lifespan of the headphones.
From understanding the importance of cleanliness, identifying the pad material, gathering the right cleaning tools, to the actual cleaning and drying process, every step counts towards effective headphone maintenance.
Moreover, regular cleaning provides an opportunity to inspect your headphones for any wear and tear, enabling you to address minor issues before they escalate. So, whether you’re a casual listener, a passionate audiophile, or a professional sound engineer, these cleaning guidelines can help ensure that your headphones deliver the optimum sound quality for years to come.
In essence, caring for your headphone pads equates to caring for your auditory experience. So, let’s embrace the process of cleaning and make it a part of our regular device maintenance routine.
After all, cleaner headphones mean better sound, greater comfort, and a richer, more immersive listening experience.
Table of Contents
- Understanding the Importance of Cleaning Headphone Pads
- Determining the Type of Your Headphone Pads
- Gathering Necessary Cleaning Materials
- Step-by-Step Guide to Cleaning Headphone Pads
- Drying and Re-attaching Headphone Pads
- Conclusion
- Understanding the Importance of Cleaning Headphone Pads
- Determining the Type of Your Headphone Pads
- Gathering Necessary Cleaning Materials
- Step-by-Step Guide to Cleaning Headphone Pads
- Drying and Re-attaching Headphone Pads
- Conclusion


