How to Choose a Mechanical Keyboard: Switches, Sizes, Sound

Upgrading to a mechanical keyboard is one of the most noticeable improvements you can make for your desk setup. Unlike the standard membrane models packed with most computers, mechanical keyboards provide a far more satisfying typing sensation, superior durability, and vast possibilities for personalization.
Each press offers a distinct tactile response that can make work and play more enjoyable. The market, however, is filled with a huge variety of switches, sizes, and materials, making a first purchase seem complicated.
Mechanical Switches Explained
The most significant decision you face when purchasing a mechanical keyboard involves selecting the switches. These small components live underneath every keycap and dictate exactly how typing feels and sounds.
While the case material and layout matter for aesthetics and ergonomics, the switch defines the actual interaction you have with the device every time you press a button. Getting this component right ensures the keyboard satisfies your specific needs for gaming or typing.
The sheer number of options can seem confusing at first, but they all serve the same purpose of translating your finger movements into digital signals.
The Mechanics Behind the Keystroke
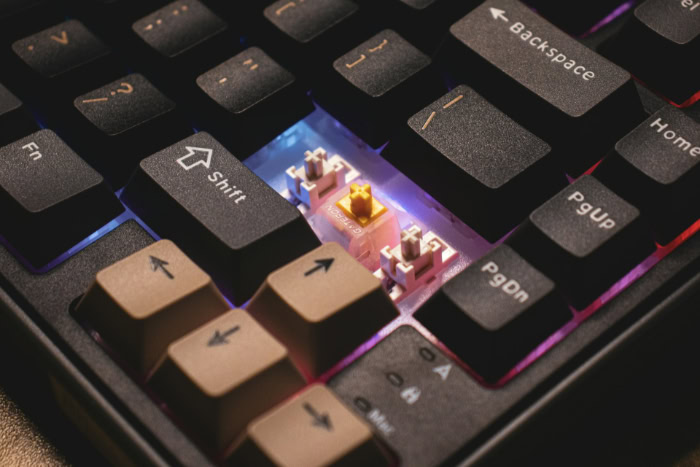
Standard keyboards usually rely on a single rubber membrane sheet that registers a press only when you bottom out the key. Mechanical boards differ significantly because they use an individual physical mechanism for every single button.
This design allows for greater precision and consistency. You do not always need to press the key all the way down to register a character, which can reduce finger fatigue over long sessions.
The specific construction of the stem and spring inside the housing creates a unique sensation that membrane boards simply cannot replicate. Because each switch is a self-contained unit, you gain the ability to choose exactly how much resistance and feedback you want under your fingers.
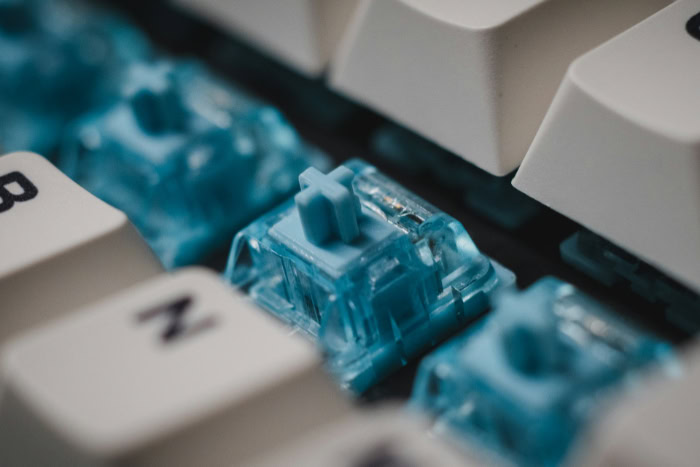
The Three Main Switch Types
Manufacturers produce switches in dozens of colors and weights, but they almost all fall into three primary categories based on their behavior.
Linear switches provide a smooth, consistent keystroke from top to bottom without any physical bump or resistance point. Gamers often prefer them because the lack of friction allows for rapid, repeated presses. They are usually quiet and straightforward. Red switches are the most common example found in this category.
Tactile switches are generally favored by typists. As you press down, you feel a distinct bump around the halfway point. This physical feedback lets your fingers know the key has registered without needing to look at the screen or bottom out the key. It offers a satisfying confirmation that aids in typing accuracy. Brown switches are the standard reference for this style.
Clicky switches function similarly to tactile switches but add an intentional sound to the tactile bump. You will hear a sharp “click” noise every time a key registers. Some users love the auditory feedback reminiscent of old typewriters. Others find the high-pitched sound distracting. Blue switches are the most famous version of this type.
Considering the Sound Profile
Your environment should dictate your choice just as much as your personal preference. Mechanical keyboards are naturally louder than membrane ones, but the volume varies drastically depending on the switch type.
Clicky switches are rarely suitable for shared spaces like open offices or dorm rooms because the noise will likely annoy neighbors.
Linear and tactile switches are significantly quieter. You can even dampen them further with silent specific variants if noise is a major concern.
If you work alone or have a private office, you have the freedom to choose any noise level you enjoy. However, if you are frequently on voice calls or share a room, opting for a linear or silent tactile switch is usually the best move to maintain harmony with those around you.
Keyboard Layouts

Selecting the right size requires looking at your desk space and analyzing your daily workflow. Mechanical keyboards come in various form factors, usually denoted by a percentage that represents how many buttons they have compared to a standard board.
The goal is to find a layout that retains the buttons you use frequently while discarding the ones you ignore.
The Standard Full-Size Layout
The 100% layout remains the default for most office environments and desktop computers. It features the full alphanumeric block, a dedicated function row, a navigation cluster, and the number pad on the far right.
Professionals who work heavily with spreadsheets or data entry often find the number pad non-negotiable for efficiency. It offers the most utility since nearly every command has a dedicated button, meaning you rarely need to use special shortcuts.
However, the width can be a drawback. A full-size board occupies a significant amount of desk real estate and forces right-handed users to extend their arm further out to reach the mouse, which can cause shoulder strain over time.
The Balanced Tenkeyless Design
The Tenkeyless, commonly abbreviated as TKL or referred to as an 80% layout, essentially takes a full-size board and removes the number pad. This configuration strikes an excellent balance between functionality and ergonomics.
You retain the dedicated arrow keys and the navigation cluster containing Home, End, and Page Up, meaning you lose very little in terms of general computer navigation. The primary advantage is the extra space gained on the right side.
This allows the mouse to sit closer to the keyboard center, creating a more natural shoulder posture and providing gamers with significantly more room for sweeping mouse movements.
Compact and Minimalist Form Factors
Moving below 80% introduces layouts like the 75% and the 60%, which prioritize portability and minimalism. A 75% board packs the keys of a TKL into a tighter frame by eliminating the empty gaps between key clusters, usually retaining the arrow keys and a function row.
The 60% layout takes a much more aggressive approach. It removes the number pad, the arrow keys, and the top function row entirely.
Accessing these missing commands requires using a “layer” system, where holding a specific function button transforms the remaining keys into the missing inputs. While this saves massive amounts of space, it requires a learning curve to memorize the shortcuts for things like arrow navigation or the F-keys.
Materials and Durability
When you invest in a mechanical keyboard, you are buying a tool meant to survive millions of keystrokes. The construction quality defines not just the lifespan of the device but also the acoustic experience and the tactile satisfaction of every press.
Manufacturers use a wide array of plastics and metals to build their boards, and knowing the difference helps you see why one model might cost forty dollars while another costs four hundred.
Keycap Materials
The plastic caps your fingers touch are the first line of defense against wear. Most budget and mass-produced keyboards come with ABS (Acrylonitrile Butadiene Styrene) keycaps.
ABS allows for vibrant colors and is easy to mold, but it develops a greasy shine over time as the texture wears smooth from finger oils. This “shine” makes the board look old relatively quickly.
In contrast, PBT (Polybutylene Terephthalate) is a harder, more brittle plastic favored by enthusiasts. PBT caps usually have a textured, slightly sandy finish that resists smoothing out.
They maintain their matte look for years, offering a more consistent feel that does not become slippery after heavy use.
Case and Plate Materials
The shell surrounding the internal components plays a massive role in the sound profile and stability of the keyboard. Plastic cases are common in entry-level boards.
They are lightweight and portable, making them easy to carry in a backpack. However, thin plastic can sometimes flex under pressure and may produce a hollow echo when typing.
Aluminum cases represent a step up in quality. A metal chassis adds significant weight, planting the keyboard firmly on the desk so it never slides around during intense gaming or typing sessions.
This density also changes the sound, absorbing vibrations to create a deeper, more solid tone rather than a high-pitched clatter. While aluminum drives up the cost, the trade-off is a device that feels like a permanent piece of industrial equipment rather than a toy.
Essential Features
Modern mechanical keyboards often include capabilities that extend far beyond simple typing. Manufacturers pack features into their devices to improve convenience, extend the lifespan of the product, and allow for personal expression.
Paying attention to these specifications ensures you do not outgrow your purchase in a few months.
The Value of Hot-Swappable Sockets
One of the most valuable advancements for beginners is the hot-swappable PCB. In the past, changing a switch required desoldering the old component and soldering in a new one, a process that frightened many users and voided warranties.
Hot-swap sockets utilize small clamps that allow you to pull a switch out with a simple tool and snap a new one in place instantly. Such a design eliminates the fear of commitment regarding switch choice.
If you buy a keyboard with linear switches and decide later that you prefer tactile ones, you can simply swap the parts rather than buying an entirely new device. It transforms the keyboard into a flexible platform that can adapt as your tastes change over time.
Connectivity
How you connect your device determines both the look of your desk and the performance of your inputs. Wired connections via USB-C remain the gold standard for competitive gaming because they offer the lowest possible latency and never require charging.
Cables can clutter a workspace, however, leading many to prefer wireless solutions. Wireless options usually come in two forms: Bluetooth and 2.4 GHz radio frequency.
Bluetooth works well for general typing and connecting to tablets or phones but can sometimes suffer from slight lag or interference. The 2.4 GHz connection, usually paired with a USB dongle, offers near-wired speeds without the cable mess.
Many modern boards offer a “tri-mode” connection, giving you the flexibility to switch between wired, Bluetooth, and 2.4 GHz depending on the task at hand.
Software Customization and Control
The ability to customize what your keyboard does is just as important as how it feels. Companion software allows you to remap buttons, meaning you can place the Control function where Caps Lock sits or disable the Windows button during games to prevent accidental minimization.
Advanced users often utilize macros to execute complex strings of commands with a single button press, which streamlines repetitive tasks for work or gaming. Visual customization also plays a role here.
Software controls the RGB lighting, letting you set specific colors to match your setup or create reactive patterns that light up as you type. Having robust software support ensures the hardware works exactly how you need it to, adapting to your specific workflow.
Pre-Built vs. Custom

Deciding how you acquire your keyboard is just as significant as selecting the specific parts. You have the option to purchase a finished product that works immediately out of the box, or you can assemble one yourself to ensure every detail matches your specifications.
This choice largely depends on how much time and effort you wish to invest. Some users view the keyboard purely as a tool for productivity, while others see it as a hobby that involves tinkering and fine-tuning.
The Convenience of Pre-Built Models
Buying a pre-built keyboard remains the most logical route for the vast majority of first-time buyers. You receive a complete unit with switches, keycaps, and a case all assembled and tested by the manufacturer.
It offers a true plug-and-play experience that requires zero technical knowledge or assembly time. Companies like Keychron, Ducky, and Corsair specialize in these ready-made boards, ensuring that the stabilizers are lubed and the firmware is stable before shipping.
Opting for a pre-built model also typically provides better warranty support since the entire device is covered as a single unit. If you simply want to upgrade your typing experience without turning it into a weekend project, a pre-built board is the correct answer.
The Barebones Middle Ground
A barebones kit serves as an excellent compromise between buying a standard product and building a custom one from scratch. These kits usually include the case, the printed circuit board (PCB), the plate, and the stabilizers, but they arrive without switches or keycaps.
You purchase those two components separately based on your specific preferences. The main advantage here is that you do not pay for stock switches or cheap keycaps that you plan to replace anyway.
It allows you to combine a high-quality aluminum case with the exact niche switch you want, all without needing to solder or disassemble the entire unit. It offers a taste of the custom experience while avoiding the most difficult parts of assembly.
Establishing a Realistic Budget
Prices in the mechanical keyboard market vary wildly, but understanding the tiers helps manage expectations. Entry-level boards typically range from $40 to $80.
In this bracket, you can expect decent plastic builds and reliable, albeit generic, switches. The mid-range tier sits between $100 and $200.
This is the “sweet spot” where you start finding aluminum cases, PBT keycaps, and superior sound dampening foam. Spending over $200 moves you into the high-end category.
At this price point, you are paying for heavy industrial design, unique mounting systems for softer typing, and heavy brass weights. Most beginners will find incredible value in the entry to mid-range categories, as the gap in quality between budget and premium boards has narrowed significantly in recent years.
Conclusion
Selecting the ideal mechanical keyboard relies on a logical progression of choices. Prioritizing the switch type first ensures the typing sensation matches your personal style, while picking the correct layout guarantees the board fits your workflow and desk space.
Once those basics are set, you can refine your search by looking at build materials and connectivity options that align with your financial limits.
Remember that the “best” keyboard is entirely subjective. A setup that feels perfect for a competitive gamer might feel uncomfortable for a writer.
Because preferences often shift as you gain experience, starting with a hot-swappable keyboard is usually the smartest move. It offers the freedom to experiment with new switches in the future without forcing you to buy an entirely new device, allowing your hardware to adapt as you learn more about what you enjoy.


