How To Install an IO Shield: Simplifying PC Assembly

Installing an IO (Input/Output) shield may seem like a minor step in assembling a computer, but its impact on the overall health and functionality of your system is far from trivial. This seemingly simple piece of metal or plastic plays a critical role in safeguarding your motherboard from electrostatic discharge and external contaminants like dust.
Understanding the IO Shield
The IO shield, a component often overlooked, is a vital part of any computer build. It serves as the interface between the computer's motherboard and the external environment.
This guide explores what an IO shield is, its functions, and the various types it comes in, providing a comprehensive understanding of its role in computer assembly.
What is an IO Shield?
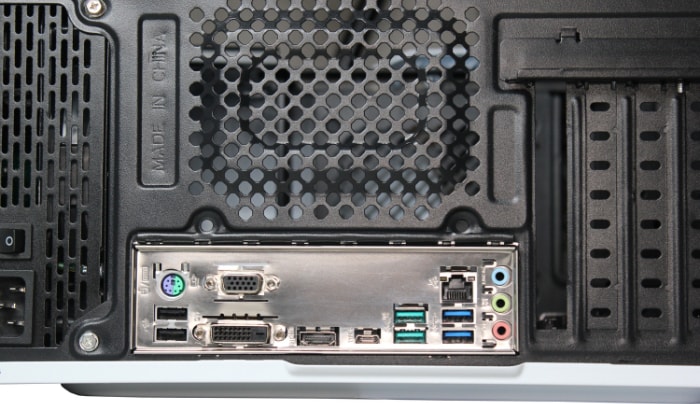
An IO shield is a metal or plastic plate that fits into the back of a computer case. It is designed specifically to align with the ports and connectors on a motherboard.
The primary function of an IO shield is to protect the motherboard's delicate electronic components from dust, debris, and electrostatic discharge, which can be damaging. Furthermore, it provides a neat, organized look by covering the gap between the motherboard and the case, preventing the entry of small objects or insects that could cause shorts or other damage.
Functions of the IO Shield
Protection from Electrostatic Discharge
Electrostatic discharge (ESD) can be detrimental to electronic components. The IO shield helps to ground the motherboard, reducing the risk of damage from ESD.
Dust and Debris Shielding
The shield acts as a barrier against dust and debris, which can accumulate over time and potentially cause overheating or short-circuiting in the motherboard.
Aesthetic and Organizational Role
Besides protection, the IO shield helps in maintaining the aesthetic appeal of the PC build. It ensures that the rear of the computer looks neat and organized, with all ports and connectors properly aligned and accessible.
Preparations Before Installation
Proper preparation is crucial when installing an IO shield, as it ensures a smooth and successful installation process. This preparation involves gathering the necessary tools, understanding safety precautions, and readying the computer case for installation.
By paying attention to these preparatory steps, you can avoid common pitfalls and ensure that your motherboard and IO shield are installed correctly and safely.
Essential Tools for Installation
Basic Tools
- Screwdriver: Needed for opening the computer case and potentially for securing the motherboard.
- Anti-static Wrist Strap: Essential for grounding yourself to prevent static electricity from damaging the computer components.
Optional Tools
- Flashlight: Useful for better visibility, especially in cases with limited light.
- Magnifying Glass: Helps in closely inspecting the alignment and fitting of the IO shield.
Safety Precautions
Grounding Yourself
The importance of grounding cannot be overstated. Static electricity can inadvertently damage sensitive components.
Using an anti-static wrist strap or touching a grounded metal object before handling computer parts can mitigate this risk.
Working in a Clean Environment
Ensure your workspace is clean and free of dust and debris. A clutter-free environment reduces the risk of losing small components and minimizes the introduction of contaminants into the computer case.
Preparing the Computer Case
Accessing the Motherboard Tray
- Power Down and Unplug: Ensure the computer is turned off and unplugged from any power source.
- Remove Side Panels: Most cases have removable side panels for easy access to the interior.
Locating the IO Shield Placement
- Identify the Rear Panel Area: This is where the IO shield will be installed. It's typically a rectangular cutout on the back of the case.
- Clearing the Area: Make sure the area is free from any obstruction and clean of dust.
By following these preparatory steps, you set the stage for a successful installation of your IO shield. These measures not only protect your components but also make the installation process smoother and more efficient.
Step-by-Step Guide to Installing the IO Shield

Installing an IO shield is a straightforward process that can be accomplished with ease by following a step-by-step approach. This guide walks you through each stage of the installation, ensuring that your IO shield is properly and securely fitted.
This not only protects the motherboard but also ensures that all ports and connectors are accessible and aligned correctly.
Step 1: Aligning the IO Shield with the Motherboard Layout
Before starting, it's important to understand the orientation of the IO shield in relation to the motherboard.
- Examine the IO Shield: Look at the cutouts and shapes on the shield and match them with the corresponding ports on the motherboard.
- Correct Orientation: Ensure that the shield is oriented correctly so that all ports will line up once the motherboard is installed.
Step 2: Inserting the IO Shield into the Case
- Position the IO Shield: Hold the shield so that its external ports face outwards from the back of the case.
- Apply Even Pressure: Gently but firmly press the edges of the IO shield into the slot in the case. You should hear a clicking sound as the tabs on the shield snap into place.
Step 3: Ensuring Proper Fit and Alignment
- Check All Sides: Ensure that the IO shield is flush against the case on all sides.
- No Gaps: There should be no gaps between the shield and the case to prevent dust from entering and to ensure electromagnetic interference (EMI) protection.
- Adjust if Necessary: If the shield isn't fitting properly, gently adjust it by applying pressure on the areas that are not fully seated.
Step 4: Troubleshooting Common Issues
Even with careful installation, you might encounter some common issues. Here's how to handle them:
- Misalignment: If the ports on the motherboard don't align with the cutouts on the IO shield, recheck the orientation and adjust as necessary.
- Difficulty in Fitting: If the shield is hard to fit into the case, do not force it. Check for any obstructions and try repositioning it gently.
By following these steps, you can ensure a secure and correct installation of your IO shield. A properly installed IO shield not only provides crucial protection for your motherboard but also enhances the overall look and feel of your PC build. Remember, patience and attention to detail are key during installation.
After Installation: What Next?
Successfully installing an IO shield is a significant step in assembling or upgrading a computer. However, the process doesn't end there. The subsequent steps involve securing the motherboard, connecting components, and performing final checks.
This stage is crucial for ensuring that everything in your system is set up correctly and functions optimally.
Securing the Motherboard
Once the IO shield is in place, the next task is to install the motherboard.
- Position the Motherboard: Carefully align the motherboard with the standoffs in the case and the ports with the openings in the IO shield.
- Secure with Screws: Use a screwdriver to secure the motherboard to the standoffs, ensuring it is firm but not overly tightened to avoid damaging the board.
Connecting the Components
After the motherboard is secured, it's time to connect various components.
- Power Supply: Connect the power supply unit (PSU) to the motherboard, ensuring that the 24-pin and 8-pin power connectors are properly seated.
- Storage and Peripherals: Attach SATA cables for hard drives or SSDs and connect any additional peripherals like USB headers, audio connectors, and front panel controls.
- Graphics Card and Expansion Cards: If you have a dedicated graphics card or other expansion cards, install them in the appropriate PCIe slots and secure them.
Final Checks
Before powering on the system, a few final checks are necessary.
- Cable Management: Tidy up the cables for optimal airflow and a clean look. Use cable ties or clips to keep cables organized and away from fans.
- Inspect Connections: Double-check that all cables and components are connected correctly and securely.
- Test the System: Power on the computer to test. Listen for any unusual noises and monitor for any error messages or beeps that could indicate an issue.
Completing these steps after installing the IO shield helps in creating a stable and efficient computing environment. It's about attention to detail and ensuring that each component not only fits together physically but also works in harmony for optimal performance and longevity of your PC.
Conclusion
Understanding each step in the process of installing an IO shield is key to ensuring the longevity and efficiency of your computer. This guide has taken you through the importance of the IO shield, the preparations required before installation, the installation process itself, and the steps to follow afterward.
By meticulously following these instructions, you can safeguard your system against physical and electrostatic damage while ensuring optimal operation. The careful installation of an IO shield, though a small task in the grand scheme of PC assembly, is a crucial one, underscoring the importance of attention to detail in every aspect of building and maintaining a computer.


